Tuesday, August 12, 2014

Revel and LynB Designs

Last week I did my manicure using Revel Nail gel polish and then I did some stamping over it. Well, it's been a week and of course, time to change the manicure. I took off the stamping art with some non acetone nail polish remover and here is what I was left with:

 
Still looks pretty good! There's a little wear at the tip but there are no chips and that gel shine we love is still there. However, since it's time for a new color or two, I decided to polish right over the gel. I couldn't see taking the time to remove it when it was still in pretty good shape. And what better polishes to use than some new polishes from Jennalyn at LynBDesigns. She recently had a sale and I couldn't resist. Here are two of the polishes I purchased, Nightmare Revisited and Blue Whale.
 
 
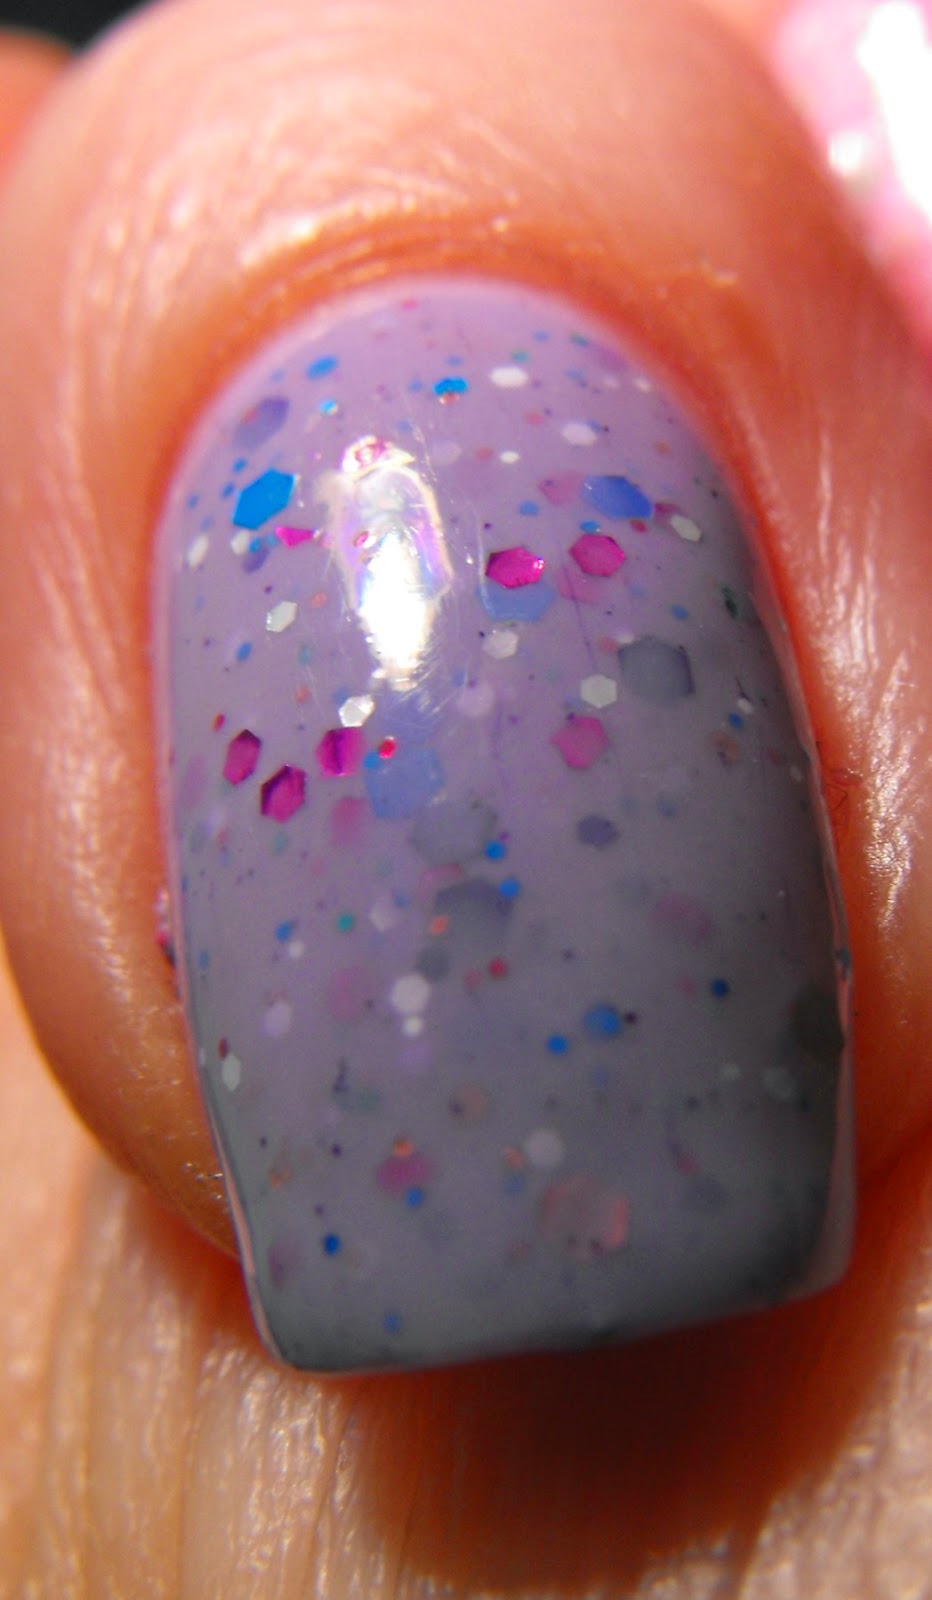
Blue Whale is one of those polishes I've been wanting since the launch of "They say of the Acropolis" collection and Nightmare Revisited is a beautiful holographic polish - need I say more. here is how they look over the Revel gel polish:
 

Not bad! Look at all the glitter in Blue Whale and that gorgeous holographic effect in Nightmare Revisited. Here's a closer look:


I know there isn't any nail art this time but I just couldn't put anything over these beauties. Let's see what next week brings!


Monday, August 4, 2014

A Manicure (& More!)

My new manicure was done using Revel Nail gel polish. Someone had posted about this polish on Facebook (sorry, I don't remember who) and said you could get a free sample from their site. Well, I headed on over to their site and it was true, well sort of. The free sample consisted of their base coat, top coat and a color for $10.99. Not exactly free but still an excellent deal when you consider that usually 1 bottle of gel polish alone can cost that much. In addition, these are .5 oz. bottles, not the tiny bottles you usually get. There was no choice in the color but I was very happy when I received my order. The color I received was called Hysteria, a beautiful purple shimmery polish.

 
The application of this polish was a breeze. The polish went on very smoothly and each coat only needed 30 seconds under an LED lamp to cure. I used my Sensationail lamp and it worked great. Here is how they look:
 
 
I love the shimmer in the polish, just enough to add a little extra shine. However, I had to make this manicure a little more interesting so I added some stamping art to it. I don't stamp very often and I only have a few stamping plates. I did order some new ones from the Born Pretty store but they haven't arrived yet. So I used my Konad plates along with some white Konad polish and here is the result:
 
I added a little silver glitter just to add some extra sparkle. I'm happy with the results. It took a few tries on some of the nails to get the stamping right but with gel polish as a base, it's easy to remove the failed stamping attempt and redo it without having to repolish the whole nail again.
 
One of the drawbacks to using gel polish though is how long it lasts on my nails. I have so many polishes that I want to use and when I use gel polish, I hate to take it off after only a few days because it still looks great and it's such a pain to get off. This polish is supposed to soak off in only 7 minutes (unless you use primer) so maybe it won't be so bad!
 
Now for the More part of this post.
 
Recently I've had the opportunity to take some fun acrylic painting classes. They were held in a local bar and were hosted by a wonderful woman, Tammy Hoey. I've never really painted before but she is so inspiring and encouraging that I decided I would try and create my own design. I bought the supplies and after seeing a picture in the newspaper of a beautiful sunset, I felt it was time to try my hand at painting on my own. This is what I got:
 

I think it came out pretty good for the first time on my own. I have some other ideas I'd like to try and I figure with practice, I should get better.


Thursday, July 31, 2014

Two Posts in One Week?!

Wow, another post in the same week. What is going on is the world? Actually nothing special. My initial plan was to go to Six Flags Great Adventure with my boys but my older one got his days off mixed up and had to work. It would've been the perfect day for it but we'll try again another time. But since I'm home, I thought it would be the perfect opportunity to post about my current manicure. Here is the result:


This is based on a design that I saw on the Pointless CafĂ© blog. I thought her design looked great and decided to try it on my own. She also has a tutorial that I followed to try and get the same effect. I used Sinful Colors Pink Forever as the base coat and the stripes were done with Wet n Wild Coast to Coast (blue), China Glaze Aquadelic (minty green) and NYC Jacaranda Flower (purple). I put some China Glaze Fairy Dust over the whole nail to add some sparkle. Then I topped everything off with 2 coats of Seche Vite to smooth everything out and give my nails a terrific shine.
 
 
I love the summery feel of this manicure and will probably be a little sad when it comes time to take it off. But then I will have the opportunity to try something new and share with you.

Tuesday, July 29, 2014

Jordana Nail Art Fun

I've decided to try and use some of the polishes I have that have never been used so what better way than to use it for a manicure with some nail art. The polishes I used for this were Jordana polishes that I purchased in a local "dollar" store. I thought they'd look great together which I think they do. Here are the polishes I used for this mani:


I thought they were bright, fun, summery colors. I did start out with a plan, however, once I started polishing my nails, that plan went out the window. This is the result:


I was originally going to do all of my fingers like my ring finger but I would've used the bluish polish as my base coat. I decided to have some fun instead and try some other designs. My middle finger was done with a paintbrush and while it didn't come out as I had planned, I was still happy with the result. My thumb is another story. Here is the end result:
 
 
I don't know what my initial intentions were. I just kept adding stripes and this was the end result. I would call it a happy accident. This turned out to be my second favorite nail of the bunch (the ring finger spotted design was my favorite).
 
I haven't done any hand painted nail art in a while as I've been using some of my glitter polishes and don't like to spoil the glitter effect with painting over it. But this was a fun change of pace!


Monday, July 21, 2014

Pink and Purple

Good Morning everyone! I have pictures of this weeks manicure ready to share. I went with some new and untried this week.


The polish on the left is Watermelon Sundae by Squishy Face Polish. It's a light pink loaded with small green, silver, red, and white small glitters. The polish on the right is Iris My Case by KB Shimmer. It's a light purple polish loaded with purple, fuchsia, silver, blue and white. There are various sizes of glitter but they are all small to micro sized.


I found the Watermelon Sundae to be a little thick in the application but I think a little thinner could probably solve that problem. I love the different colored glitters in the polish, that's why I bought it. I also bought a purple polish from Squishy Face (I have a tendency to go straight for anything purple) but I decided to go with the KB Shimmer Iris My Case because it's my first KB Shimmer polish and I heard so many great things about them. Well, I heard right. Application was a breeze. I did find that I needed 3 coats on some of my fingers but that could be because I put the second coat on before the first was dry enough.


All in all, I'm very happy with this week's manicure. I love the way the pink and purple go together, perfect for summer. This will be my mani for the next few days because once I put polish on and it looks good, I don't like to take it off until I have to. I know there are bloggers who change polish very often, sometimes multiple times in a day. I like to enjoy my manicures and share with my family, friends and coworkers who look forward to seeing what new colors and/or designs I'm wearing each week. I will have to try and show each manicure once I've done it for the week. Sometimes I get lazy, the nails get polished but the pictures don't get taken. Sorry about that.

Tuesday, July 1, 2014

Happy 4th of July

Good morning everyone! I just wanted to share my 4th of July manicure with everyone. I kept it fairly simple but I've received many compliments on it. I even have someone that wants me to polish her nails like mine for a big Fourth of July party she's having.


I used a base coat of Sinful Colors Tokyo Pearl on all of my fingers except my ring finger. I used Wet n Wild Metallica.  The red is NYC Broadway Burgundy and the blue is a polish I recently purchased, Wet n Wild Coast to Coast. But the main reason I wanted to do a July 4th mani was to use Salon Perfect Star Spangled on my ring finger. When I first saw the Salon Perfect display at Walmart, there were many polishes I would have purchased. But I had to be realistic and I decided to only purchase the one I thought would be more unique. That's why I chose Star Spangled. I love that it also has some holographic micro glitter in it to make it sparkle even more.


It was a little difficult to get enough stars out of the bottle for my first coat but when I went to put the second coat on, I was getting more stars than I wanted. However, I was able to get them how I wanted them and I was happy with the way this manicure turned out.


I have many more new polishes that I haven't yet tried and look forward to posting some of those manicures here to share. I'll try to post more regularly but I'm not making any promises.
 
 
I hope everyone has a happy and safe Fourth of July! See you soon!

Wednesday, April 16, 2014

Spring is here! (?)

The calendar says April 16 but as I look out the window at the snow covering the windshield of my car, I have to ask myself "Is Spring really here?" Of course it is. It's now time for pretty pastels and fun colors to celebrate my favorite season. Here's two I recently created, Spring Fling and Spring Flowers.
 
 
Spring Fling is the purple polish with the bright glitters. Spring Flowers is the pink polish with pastes glitters on my ring finger. Shown is 3 coats over a base of white. I think they're great colors for this time of year, especially with Easter coming up this weekend. My friends have commented that these remind them of Easter eggs or even the malted robin's eggs that my son loves.
 
While I'm posting, since it has been a while, I'd like to show you some other manicures I've done with the polishes I've made. Here is the combination I wore last week:
 

These are Mermaid's Garden with an accent nail of Crocus Time (another spring reference). I love the blue of Mermaid's Garden, it's very bright and sparkly. These are 2 coats with a base coat and top coat. I received plenty of positive comments from my friends with these polishes.
 
 
These polishes are available at http://lipolish.storenvy.com along with many others. Please take a look. If you have any suggestions, I'm open to them. Thanks for viewing.

Sunday, March 2, 2014

Purple for Life

Hello all. I hope you've had the chance to visit my store. I've added some new polishes today. One of the polishes that I'm excited about is Purple for Life. Here's a picture.
Purple for Life is a polish I made to help support the Relay for Life organization. For those of you unfamiliar with Relay for Life, it is an inspirational overnight event that honors cancer survivors and celebrates life. Local teams are formed and they raise money for the American Cancer Society. My son has participated for the last several years and I though this polish would be a great way to help him raise money for this worthy cause. The proceeds from the sales of this polish will go to his team, the Avengcures, to be donated. I have listed this polish in my store: http://lipolish.storenvy.com. I will be adding others and also plan to sell them at their Relay for Life event at Newfield High School in Selden, NY on May 16, 2014.

I decided to wear this color this week because I love it. It is such a rich purple and I love purple. I decided to do some springlike nail art because I'm sick and tired of winter and the snow. I got the basics of this design from cutepolish. She posts tutorial videos on youtube that are very easy to follow and look very pretty. Check them out, they're cute!


I used Purple for Life as my base and used Sinful Colors for the flowers and the tips. You can really use any colors you'd like, I just thought that pink and yellow looked good with the purple.

That's all I have for now. I welcome comments and any feedback on my store. I'm new at this so it's still a work in progress but I hope to continue with it. Thanks!


Sunday, February 23, 2014

L. I. Polish

I finally did it - I started making my own nail polish. This wasn't something I had planned to do, there are hundreds of people out there already making nail polish, most of them quite good. However, my husband encouraged me to join them, he has great confidence in me. I have to admit, it is fun to do. I love to create things and this falls right in line with that. I don't know if I'll ever see the same level of success as some of the other brands out there but I can only try!

I've opened a store at Storenvy to sell my creations. The address is http://lipolish.storenvy.com.  You'll be able to see what I've made so far. I'll be adding new items when I come up with things that I like. Unfortunately, not everything turns out as expected.  I have received some input from my kids, that's why I have some polishes representing superheroes - I have 2 boys.

This is the latest polish I've added to my store, All That Glitters... My husband is actually the one who came up with the idea for this one. I figured why not! I was pleasantly impressed with how it turned out and everyone that's seen it has loved it.

All That Glitters...
 
 
All That Glitters... is a glitter topper, gold and silver holographic glitters in a clear base. It looks great over a base coat or over bare nails. This is one of my favorites so far. Here are pictures over base coated nails and over bare nails so you can see for yourself.


I have some more that I'll be adding to the store, I just need some names. Sometimes, that's the hardest thing.

Please visit my store and let me know what you think. I look forward to hearing from you!

Sunday, February 9, 2014

Valentine's Day Mani

Good Morning all! I finally have the opportunity to post the first Valentine's Day manicure I've done for 2014. If all goes well, there will be another later but at least let me show you this one.


I started with a base of Sensationail Pink Chiffon because I was going to attempt to do some stamping. I wanted a base that I could easily clean off and the Sensationail Gel polish is great for that. A little non acetone polish remover can take off any errant stamping without removing the base polish. For the stamping, I used the Salon Express set for the heart design and Konad M57 for the lacy tips. I used the red Konad polish for the art because it was handy. I was rather pleased with how it came out. My previous attempts at stamping were not pretty. I don't know if I had more patience this time or because I was the only one home and had no distractions (hubby and boys were at a Monster Truck show). I'll admit, I did have to redo some of the nails until I was happy with the design. But all in all, I like the outcome and I will definitely do some more stamping in the future.
 
 
My plan is to remove the design this weekend and do another Valentine's Day manicure right over the Sensationail Gel because I've only had the gel on for 1 week and it's still in pretty good shape. I only have 2 small chips on my right thumb but those were my fault for trying to pry open a small jar with my thumb.
 
 
I do have some exciting (at least for me) new coming up and hope to post about it within the next few days. Please keep checking back. I have also linked this to my Facebook page so maybe I can expand my audience and possibly offer some giveaways in the future.
 
Until next time, Marian

Saturday, January 18, 2014

Finally, A New Post!

I'm sorry for such a delay between posts. I guess I let the holidays get in the way. Unfortunately, I didn't take any pictures of my Christmas mani. I don't know how I forgot, but I did. I'll make up a little for that with this post. I have two recent manicures to show. No nail art this time, just pretty polishes.  Here is the first:

 
This is Grape Soda by Liquid Lacquer. Anyone who knows me knows that I have a thing for purples so my purchase of this polish didn't surprise anyone. I love the shade of purple of this polish and the white glitters in it look just like the bubbles in a bottle of soda. I used 3 coats of polish to get the bright purple you see in the pictures. And because it's a jelly base, the white glitters on the earlier coats show through nicely. I received lots of comments from my friends on this polish.


The next polish is from one of my recent purchases from LynBDesigns.
 
 Space Gandalf without flash (indoor lighting)


 Space Gandalf with flash (indoor lighting)
 
 
This polish is from her "Doctor Who" collection. I'm not a Doctor Who fan, I know what it is and I've seen some scenes from the show, but I don't know all the ins and outs of it. I do know that I loved the way this polish looked in her Etsy store so I had to purchase it. I wasn't disappointed. I used 2 coats for the above pictures with no undies. I love the holographic glitter in it along with the occasional moon glitter. The polish is more sparkly in person than in the pictures but you can see the difference with the flash.
 
 
I got plenty of polishes for Christmas so I have plenty to try out. Plus, Valentine's Day is coming up. I hope to get some fun Valentine's Day nail art done that I will have to make sure I post on the blog.


Monday, November 25, 2013

Thanksgiving 2013 Waterfall and Turkey

Good Morning everyone!  Sorry it's been so long since my last post.  I only usually change my manicure once a week and the last few have been plain.  I still should've posted them because the colors still looked great, but I never got the chance to take a good picture. 

This week I have done a Thanksgiving manicure which includes a turkey and a waterfall mani using some autumn colors.  I want to thank Breezy the nail polish lover for the waterfall manicure idea.  She may not be the first one to do this, but her recent postings of beautiful waterfall manicures caught my eye and I thought it would be a good pairing with my turkey.


The base coat of my manicure is a SensatioNail gel, Amber Lights.  It's a very pale beige with some shimmer.  I like using the gel polishes as my base to add strength to my nails, especially in the winter when they can become dry and brittle.  The turkey was painted with acrylic paints because I actually don't have any brown polish.  And since I needed the paints for the body, I just used the paints for the rest of the turkey too.  The remaining nails were done with stripers.  I love the way the gold stripes glisten and shine.  I love how this mani looks and it didn't take all that long to do. 
 
 
Since I found a picture of last year's Thanksgiving manicure still on my memory care, I thought I'd post that too.  The turkey is similar, but the other nails were done as autumn color French tips.


I hope everyone has a Happy Thanksgiving!  Christmas is just around the corner.  I'll be back with some Christmas manicures soon!


Sunday, October 27, 2013

BOO... it's Halloween 2013

It's almost that time for witches and goblins, tricks and treats, and as promised here is my Halloween manicure.
 

My Left Hand
 
 
My Right Hand


My Thumbs
(my thumbs aren't really 2 different sizes, it's just the angle my son took the picture at)


I decided to go with 10 different designs just to have some fun.  Some of the designs were ones I had done in the past, others were variations of designs I saw online.  Although I don't know whose designs exactly I used for reference, I want to give thanks to everyone who posts their nail art in blogs, on Facebook, and on Pinterest.
 
I did polish and paint everything over the SensatioNail gel polish, Chiffon Pink, that I still had on my nails from last week's October BCA manicure.  Once I took off the designs with some non acetone polish remover, the gel polish was still in very good shape (it had only been on a week and I usually get 2 to 3 out of it), so I polished my new base colors right over that.  I did write down my designs and color choices on paper first.  I wanted to make sure I varied my base color choices and I wanted to make sure I planned the easier designs for my right hand as I am right handed and of course, have to paint the right hand with my left.  I used dotting tools, striping polish, and a small paint brush to paint my designs.  I'm happy with how they came out.  Everyone at work loved them.  A coworker wanted me to give her a Halloween manicure for her trip to Vegas.  Here is how hers turned out:


She loved them and couldn't wait to show her friends and family.  She's already thinking of future designs I can do for her for the upcoming holidays.  I look forward to sharing those and my own with you.


Saturday, October 19, 2013

My October BCA Manicure

It's already October and almost time to think of a cool Halloween manicure. However, October is also Breast Cancer Awareness Month and I usually try to do some kind of pink themed manicure to honor the women I know who have been through the ordeal of dealing with breast cancer.  This is what I came up with for 2013:

Left Hand
 
 
 Right Hand

The pale pink base coat is SensatioNail gel Pink Chiffon. I like using the gel polishes as base coats because I find they give my nail a little more strength, especially since I am on a bowling league and I wouldn't want to break any nails!

I also decided to paint a different design on each nail just to have some fun. The color blocks on both thumbs was done with some striping tape that I removed after I had painted in the blocks. The other designs were done with either a dotting tool or striping polish. I used a variety of pinks for the designs, I just went through my polish stash and looked for bright pinks that would stand out on my nails.

I've had this on my nails for the week but with the end of October coming up, it's just about time for a Halloween manicure.  Please check back soon!


Saturday, October 12, 2013

Sensationail is Sensational!

I'm sorry it's been so long since my last post. I've been testing my Sensationail
Gel manicure so I could take some pictures that demonstrate it's durability. Because it has lasted so long, I've had the same manicure for 3 weeks and didn't really have anything new to post.

I've been using Sensationail Gel polish for almost 2 years now. I don't use it exclusively because I have plenty of regular nail polish that I still like to wear (and buy). However, when I do wear it, I enjoy the shine, the quick dry time, the length of time it lasts, and the comments I get on how great it looks.

The Sensationail system is very easy to use. The starter kit contains everything you need to do ten complete gel manicures. I had purchased the raspberry wine starter kit and what a beautiful color that is. I have since expanded my collection as you can see here.


The preparation of your nails is pretty easy and the instructions are clear. It only takes about a half hour to complete the manicure once you are familiar with the procedures. The results are great.  This is how my manicure looked the first day. The color shown is Ride the Wave.


This is day 14.  My Sensationail manicure still looks great. No chips, no breaking, and fortunately not too much growth.  I've only shown my left hand but the right hand looked just as good.


And this is after Day 20. Still no chips on my left hand although the nail growth is more noticeable.  I used some Maybelline Color Show Clearly Spotted on my ring finger because I wanted to see how it looked. I love how it looks and will definitely use it again. I have to admit that the pointer finger on my right hand did chip pretty badly so I removed the gel polish and just repolished it with a Polish Addict color - Blurred Lines to tide me over until I took off the rest of the gel which I did on Day 21.


I use the foil wrap method to remove my gel polish, I find it works the best. I soak a small piece of a cotton pad with acetone, place it on the nail, and then wrap the nail in aluminum foil. I keep it wrapped for about 15 minutes and then I'm able to scrape the polish off pretty easily with a removal tool made by Sensationail.

If you are looking for a gel polish system, I highly recommend Sensationail by Nailene. The system is easy to use, the polish looks great and lasts a long time, and they have been expanding their color line.

Feel free to ask me any questions and I will answer to the best of my knowledge.  Thanks!


Sunday, August 25, 2013

Rainbow Sponge Art

The previous manicure of the water marbling was my left hand.  After spending the time creating the designs and the cleanup afterwards, I wanted to do something a little easier on my right hand. Here is the result!

I used the same polish and colors as in the water marbling, however, I painted the polish in stripes on a makeup wedge sponge and sponged it onto my nails.  I didn't intentionally plan to do the colors in the order of the rainbow but I guess ROY G BIV (from school) stuck in my subconscious as I was painting the stripes. I like the way it came out and with the same colors on my left hand, they seem to compliment each other.

Tonight I will probably redo my nails so I should have a new manicure to post shortly.

On another note, I'm looking forward to receiving my nail polish orders from Zoya (the great BOGO sale) and my $20 Mystery Box from My Overnight Addiction to Nail Polish. I can't wait to use these new polishes in my manicures!

Tuesday, August 20, 2013

First Time Ever (for me) - Water Marbling

I've seen this technique on many other blogs and on YouTube and decided it was time for me to give it a try. For my first time, I think it came out pretty good!


I used all Sinful Colors for this design starting with a base coat of Snow Me White. The colors used were High Strung (a neon yellow green), Pink Forever, Why Not (a bright blue), and Tempest (a beautiful lavender). I'm sorry the picture doesn't represent the colors as accurately as I'd like it to. I'll have to work on that.

I have to admit, the process was a little messy and at times frustrating. For those of you who have tried water marbling, you probably know what I mean. For those who haven't, the process involves dripping nail polish into a cup of water and allowing each drop to spread on the surface and alternating colors with each drop. However, sometimes the polish on the water surface dries too quickly and subsequent drops don't get the chance to spread. Then you wind up with a blob of multicolored polish and have to start over again. I didn't tape my fingers around my nail and did have quite a bit of polish to clean from them but I was able to get it clean without too much trouble.

I like how each finger has a different design and how bright the colors are.  I only did my left hand because I ran out of time (had to go to Sunday dinner at mom's) and when I got back home, I wanted to finish the right had with a quicker method (I'll show that had in the near future). I did find it time consuming to get it done but over all, I think the results were worth it. Please let me know what you think!

Saturday, August 17, 2013

Summer Fruit Fun

Hello everyone and welcome to my page. I love polishing my nails and trying new designs, either my own or others I've seen. My latest manicure is just something I wanted to do that was colorful. It also gave me the opportunity to try some fruity fimo slices that I've had for a while.


The dark pink I used for the base color was from a set of polishes I bought at Kohl's as was the green for the strawberry leaves and the watermelon rind. I used a white striper for the white of the watermelon rind and just used a dotting tool to dot on the black watermelon seeds and the yellow strawberry seeds. My pointer has a fimo watermelon slice and a kiwi slice that I glued on with a small touch of nail glue and my middle finger has a starfruit and pineapple slice. Then I sealed everything in with a coat of Seche Vite.

This manicure is a week old but I think it still looks pretty good. However, it's time to change it and decide on a new design. This will give me the opportunity to post something new.

Please come back and visit.